| ||||||
| ||||||
"That's against the rules!" - Duncan MacLeod
Credits
| Highlander: TCGTM and the SwordMasterTM System Created By: |
Mike Sager |
| Arms and Tactics Lead Designer: |
Sam Orlando |
| The Four Horsemen Lead Designer: |
Sean Cordero |
| Art Direction, Visual Design, and Layout |
Matt Widmann |
| Rulebook Version 1.0 |
Sam Orlando, Sean Cordero, and the Rules Advisory List. |
| TCGames Web Page: http://www.tcgames.com/ |
Prodipto Roy, Shane Stafford, Sam Orlando |
| E-mail "Discussion" List Server highlander@monotreme.com |
Laurajean Neafsey and Vincent J. Murphy |
| HTML Adaptation |
Rules Advisory List
Jeff Barnes, Steve Crow, Jonathon
Halperyn, Bruce Loebrich, A. Allen McCarley, Paul Senft, and Stealth
Dave
Playtesters
Jeff Barnes, Nathan Byers, Steve Crow, Hank
Driskill, Jim Duncan, Scott Hadsall, Jonathan Halperyn, Doug King, Charles
Lehrman, Bruce Loebrich, Allen McCarley, Kevin Murray, Alan Murrel, Alex Pagle,
Steve Rice, Prodipto Roy, Jerry Schattenburg, Paul Senft, Shane Stafford and
Mike Swailes.
Special Thanks
Bill Panzer, Peter Davis, Gillian Horvath,
Donna Lettow, Lonko Miyazaki, Xclusive Imaging, Greystone Graphics, Wendell
Kline, and MaryJo Spellerburg.
 |
Thunder Castle Games P.O. Box 11529 Kansas City, MO 64138 (816)363-9363 E-mail: TCGames@AOL.com Web: http://www.tcgames.com/ |
(c) 1996 Thunder Castle Games. The NexusTM, The NexusTM logo, SwordMasterTM, and the SwordMasterTM logo are Trademarks of Thunder Castle Games. All Rights Reserved. Highlander (c) Davis-Panzer Productions. Printed in the United States by Greystone Graphics.
Highlander: The Card Game Rulebook ver. 1.0
Official as of 2/5/99
Game Concept and Goal of the Game
Highlander: The Card Game is designed to simulate a duel between two Immortals: yourself and your opponent. During the course of play, both players will play attacks and defenses as if they were fighting with swords. Other cards will represent the tricks, tactics, schemes, and plots you utilize to win. It may be helpful to think of the game as a series of encounters with your opponent, through the centuries, rather than a single brief duel. While these rules will give you the basic framework for the game, the cards you play will often let you do things the rules say you cannot.
Your deck of cards is your Endurance. After you have drawn all cards from your Endurance, you Exhaust. Exhaustion means a loss of Ability, but not necessarily the end of the game.
Both players are able to take a certain amount of damage before losing the duel. This amount is known as your Ability. Both players start the game with an Ability of 15. During the game, if you take damage, your Ability will be reduced equal to the amount of the damage done to you. You may only hold as many cards in your hand as your current Ability. Your Ability not only represents your 'score', but also your luck, skill, and knowledge. As you lose Ability, you will find yourself with fewer cards, and thus, fewer options, in your hand.
Your goal is to reduce your opponent to an Ability of zero, or cut off your opponent's head via a Head Shot. When a player begins their Attack Phase at zero Ability, their opponent wins the game.
A successful Head Shot will end the game quickly. A Head Shot is a modified upper attack. If your opponent cannot defend against the attack, their head is taken, and the game ends immediately.
Card Anatomy
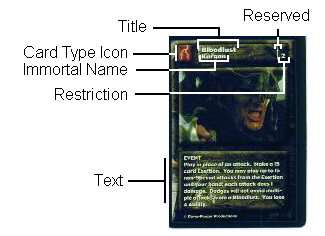
Let's examine what makes up a Highlander card:
Card Type Icon: In the upper left-hand corner of the card, there will be an icon denoting the card type, unless it's a Pre-Game card.
Title: Across the top of the card is the title bar. The title of the card will appear here, in large letters. Your deck may contain only 6 cards of the same title.
Sub-Title: Unless the card is "Generic," you will find the name of a Weapon of Choice, Persona, or Faction (e.g. Clan MacLeod) that categorizes a Persona just beneath the title, in slightly smaller letters. Though the name of a Weapon of Choice, Persona, or Faction (e.g. Clan MacLeod) may appear in the title box, it is not considered part of the title when determining card effects and restrictions. A card is Weapon Specific if it has a Weapon of Choice's name, and Persona Specific if it has a Persona's. Weapon Specific Cards cannot be included in your deck or used during a game unless you are using the proper Weapon of Choice. Only a Persona whose name or Faction name appears in the title box may include that card in their Endurance, unless you are playing with or playing as a Generic Persona (see Generic Persona).
Reserved or Signature Symbol: If a card is Signature or Reserved, there will be a Sword in the title bar, over to the right hand side. On a Signature card, the sword will have an "S" attached to it. Reserved cards cannot be included in your deck unless your Persona's name appears in the Sub-Title. Signature cards cannot be included in your deck or played during a game unless your Persona's name appears in the Sub-Title. The Restriction number (see Restriction Number) on Signature cards cannot be altered.
Hand Icon: If the card has a small white icon in the shape of a hand, it depicts something that requires a hand to be used. A card with a Hand Icon cannot be played if you already have two Hand Icons in play. You can never have more than two Hand Icons among any of the cards you have in play. If you have only one or fewer Hand Icons in play, you are considered to have a free hand. Many Pre-Game cards, such as Weapon of Choice, have a Hand Icon, and some have two. If at any time you have more Hand Icons in play than you are allowed, you may chose to Disarm any weapon you have or remove from play any of your cards with Hand Icons until you have the maximum number of Hand Icons allowed to you in play.
Restriction Number: If there is a number to the far right hand side of the Title bar, that card is restricted. Your Endurance may only contain as many of that card as the Restriction Number.
Text: At the bottom of the card, you will find the Card Text also known as Game Text. Here you will find any special instructions about that card. You may also find a sub-category to a card here. It will most likely be found following the type of card on the first line of Text.
Constructing a Deck
There are a number of card types you may wish to consider when constructing a deck:
|
|
Attacks: Attacks have a red grid icon. One or more of the squares in the grid is filled with a red square. Those red squares show where the attack is aimed. You are required to include at least one each of the nine Basic Attacks in your deck. They are: Upper Left Attack, Upper Center Attack, Upper Right Attack, Middle Left Attack, Thrust, Middle Right Attack, Lower Left Attack, Lower Center Attack, and Lower Right Attack. | |||||||||
|
|
Special Attacks: Special Attacks have a gold grid icon, and are often more difficult to defend than normal attacks. | |||||||||
|
|
Blocks: Blocks are defenses with a blue grid icon. If you have a block that covers all areas of an attack played against you, you can play that block to block the attack. You are required to include at least one each of the six Basic Blocks in your deck. They are: Upper Left Block, Upper Center Block, Upper Right Block, Lower Left Block, Lower Center Block, and Lower Right Block. | |||||||||
|
|
Dodges: Dodges are defenses with a green grid icon. If your dodge covers the same areas as an attack, you may play that dodge to avoid the attack. | |||||||||
| Special Cards: Events, Situations, Locations, and Objects are all considered Special Cards. You may only play one Special Card per turn, and only during your Defense or Attack Phases. | ||||||||||
| Events: Events have a lightning bolt icon. They may be used to quickly change the course of battle in your favor. Events are removed from play during your next Sweep Phase. | ||||||||||
| Situations: Situations have a silhouette of an Immortal as their icon. They may remain in play over many turns, and may change the conditions of the battle. | ||||||||||
| Locations: Locations have a Greek style ruin icon. Like Situations, they may change the condition of battle over many turns. However, they are more likely to affect both players. | ||||||||||
| Objects: Objects are marked with a sword icon, and include such things as extra weapons or armor, with which you may be equipped. | ||||||||||
| Edge: Edge Cards are marked with an outstretched hand icon. They may provide you the advantage you may need to win in battle. Edge Cards are not Special Cards. | ||||||||||
| Pre-Game Cards: These cards typically do not have the standard Highlander logo on the back. These cards are played before the game begins. They do not count toward the total number of cards in your Endurance. You may only use six Pre-Game cards. In addition, you cannot use more than one of any Pre-Game card. | ||||||||||
| Persona Cards: This Pre-Game card allows you to play as your favorite Persona. Persona cards have a picture of a Persona on the front, and biographical information about that Persona on the back. Below the biographical information, you will find a description of the special skills a Persona brings to 'The Game.' These skills are known as Persona Powers. You may still play the game without a Persona Card (see Generic Persona). If you play with a Persona, you may only include Persona Specific Cards for that Persona in your Endurance. You may only include Master Cards (see Card Groups) in your Endurance up to the number as indicated on your Persona card. | ||||||||||
| Generic Persona: If you choose to play without a Persona, you are considered a Generic Persona (in Highlander a Generic Immortal) and may use cards from all of the Personas. But you may only use one of each Persona Specific Card, and none of their Reserved or Signature Cards. For example, you could use one of Connor's Power Blow cards, and one of Connor's Back Away cards, but you could not use two of Connor's Power Blow or Back Away cards. You cannot include Master Cards (see Card Groups) in your Endurance if you do not use a Persona Card. | ||||||||||
| Card Groups: Any cards that share a single word in their title are considered to be part of a Card Group. For example, the cards Master Swordsman, Weapon Master and Master's Advance all have the word Master in their title and thus are part of the Master Group and are Master Cards. | ||||||||||
| Weapons of Choice: This Pre-Game card is the weapon your Persona prefers when engaging in combat. If you are using a Weapon of Choice, you may include the appropriate Weapon Specific cards in your deck. A Weapon of Choice may be used even if you do not play with a Persona Card. |
Beginning the Game
After constructing your deck, you will need a couple of other items: At least one six-sided die, something to keep score, and an opponent with their own Highlander deck to pit against you.
Both players shuffle their Endurance and offer to
let their opponent cut.. Then, each player places their Endurance to one side in
front of them. Each player then draws one card for each point of his starting
Ability (also known as Maximum Ability). Roll a
die to determine whom goes
first. After that, the players then take alternate turns. The first player
proceeds through the Sequence of Play, and finishes their turn. The second
player then proceeds through the Sequence of Play, and finishes their turn.
Player's alternate turns until one player is defeated.
During your turn, you must play at least one non-Edge card, or make an Exertion.
The Sequence of Play
A Golden Rule you must remember is that you ordinarily never do anything during your opponents' turn. Therefore, if your opponent has played a card that instructs you to perform an action, you must wait until the Sweep Phase to perform these actions. These effects are 'Must Do' and 'May Do' effects which you must take care of before proceeding with your turn (see 1a. and 1b. under Sweep Phase).
1.) Sweep Phase: When you play cards during your turn, they are left in play during your opponent's turn as a reminder of what you played. At the beginning of your next turn, you discard any cards still in play that normally do not remain in play. Cards waiting to be swept during your next Sweep Phase are considered to be in play. Any card or effect that removes a card from play does so immediately, instead of the card waiting for your next Sweep Phase.
1a.) Must Do Effects - These are taken care of first. These effects can be identified by the Text of their instructions, which will have the word 'must' in the description of the action you must take. If you have multiple 'Must Do' effects to take care of, you may handle them in any order you choose, as long as you take care of all of the 'Must Do' effects if possible.
1b.) May Do Effects - After taking care of all 'Must Do' Effects, you may then process 'May Do' effects. These effects can be identified by the Text of their instructions, which will have the word 'may' in the description of the action you may take. Again, you may accomplish these effects in any order you choose. You may opt not to do any 'May Do' effects at all.
If your opponent did not attack during his last turn you may discard one defense from your hand during this phase.
If you have an Edge Card that will counter or affect a 'Must Do' or 'May Do' effect directly, then you may play it when resolving these effects.
2.) Defense Phase: The next action you will take on your turn is to play your defenses. If there is no attack coming, you cannot play a defense, nor make an Exertion for one. You may play one defense against each attack that your opponent played in their turn, and cannot knowingly play an inappropriate defense. If the colored area on your defense card covers the entire corresponding colored area on your opponents' attack, the defense is successful and you normally take no damage from the attack.
You may play a Special Card in this phase, or wait until your Attack Phase.
3.) Attack Phase: During this phase you may normally only play one attack.. If you are prevented from playing an attack or have lost all of your attack opportunities you cannot play a attack, or make an Exertion for one. When preparing to attack, take note of the last defense you played. You may only attack to an areas that the block does not cover . A successful dodge will defend an attack as well and perhaps affect your next attack, depending on its Game Text, if any.
If you haven't played a Special Card yet, you may do so in this phase. Remember that you may only play one Special Card per turn.
4.) Ability Adjustment Phase:
Cards cannot be played once you start this phase. If a card lowers your
Ability, or you have pending damage, make that adjustment now. If a card raises
your Ability, make that adjustment now. A successful attack normally does 2
damage.
5.) Draw/Discard Phase: At this time, if you
have more cards in your hand than your Ability, you must discard down to your
Ability. These cards are immediately placed in your Discard Pile. If you have
fewer cards in your hand than your Ability, you
may draw one card at a time,
stopping at any point as long as you do not exceed your Ability. You may
normally draw cards only during this phase. If you forget to draw during this
phase, you will normally have to wait until your next Draw/Discard Phase to
draw. After dealing with any effects (if any) that may occur during this phase,
and you have completed drawing up and or discarding cards your turn is
over.
Advanced Concepts
Guard: A Guard allows you to
block a large grid area, and unlike a normal block or dodge, does not need to be
swept during your Sweep Phase. You can leave it in play and block with it again
next turn!
A Guard is still a block. If you make your Guard a
Power Block, it is only a Power Block for that turn. While you have a Guard in
play, you cannot attack to the areas covered by the Guard. You must remove your
Guard from play in order to play a
new defense, or attack to those areas.
Remember, as with other blocks, if you just blocked with your Guard, you may
only attack to areas not covered by that Guard.
Successful Attacks: An attack
becomes successful if your opponent did not play a defense or use an effect that
will block or avoid the attack, or if the attack does at least one
damage.
An attack usually becomes successful at the end of the
defending players Defense Phase. That player may declare an attack successful
before the end of their Defense Phase, instead of waiting for the end of the
Defense Phase. Any effects of a successful attack occur the moment the attack
becomes successful.
Multiple Attacks: Normally, you
have only one opportunity to attack per turn. However, you may gain additional
attack opportunities through the use of other cards or your Persona Power. For
each opportunity you have, you may play one attack from your hand, play a card
that is played in place of an attack, or make an Exertion for an
attack.
The sequence of your attacks determines the order in
which your opponent must defend. You may not rearrange the order of attacks once
you have played them. If you Exert for an attack however, you may insert that
attack anywhere along the sequence.
Multiple Defenses: You may play a
defense against each attack your opponent has played, in the sequence they
played them. However, a defense you play may block or avoid more than one attack
in the sequence, if they cover the same areas as those attacks. As soon as you
play a new defense, your previous defense will no longer help you defend further
attacks in the sequence.
You may only play a defense out of
sequence in one instance. If you Exert for a defense, you may use it to defend
anywhere along the sequence of attacks. This may change how your other defenses
block or avoid more than one attack, so be careful.
Exertions: An attempt to draw on
inner reserves of strength, through use of ones Endurance, is known as an
Exertion. To make an Exertion, reveal the top 5 cards from your Endurance. Any
cards that you reveal and do not use are placed into your Discard Pile after the
Exertion has been fulfilled. An Exertion may only be used for one function. You
may Exert in any phase of your turn.
You may only make one
Exertion per turn. After you make an Exertion, you may no longer play cards from
your hand during your current phase. For this reason, it is important to
remember to play everything you wish to play from your hand before
Exerting.
The standard uses for an Exertion include: making a
Power Blow, making a Power Block, searching for a defense, searching for an
attack, or Exerting for "nothing". These are known as Standard Exertions. Before
you make an Exertion you must always declare what you are Exerting for, and how
many cards you will Exert (if there are any cards in play that modify the size
of Exertions).
1.) Power Blows: To make a Power Blow, make an Exertion at the end of your Attack Phase and declare one of your attacks a Power Blow. When you make an attack you play a Power Blow it does 4 damage instead of 2. You may only make one Power Blow per turn. If you make a Power Blow, your opponent has the right to make the next attack they play during their next turn Hidden (see Hidden Attacks). If an attack is already a Power Blow, you cannot make it a Power Blow again. If you have a card that must be played in conjunction with an attack that is considered a Power Blow, play the card first then make the attack a Power Blow.
2.) Power Blocks: To make a Power Block, make an Exertion at the end of your Defense Phase and declare which of your blocks you are making a Power Block. You can only make a block you play a Power Block against an attack that is a Power Blow. You may play a block against a Power Blow and not make it a Power Block, but you take 2 damage. If a block is already a Power Block, you cannot make it a Power Block again. If you have a card that must be played in conjunction with a block that is considered a Power Block, play the card first then make the block a Power Block.
3.) Searching for an Attack:
There may be times where you do not want to play an attack from your hand, are
restricted to Exerting for one, or just do not have an attack in your hand. You
may make an Exertion in hope of finding an attack that you can legally play. You
may play one attack from the Exertion. If there is a possibility of making an
attack you play from your Exertion Hidden (see Hidden Attacks), you may first
play the attack then reveal the unused cards from the
Exertion.
If you have a card that requires an attack to be
played in conjunction with it, play the card first, then Exert for the attack to
play with it.
4.) Searching for a defense: You may
search from within the cards revealed in an Exertion for a defense. You may play
one legal defense from the Exertion. If you have a card that requires a defense
to be played in conjunction with it, play the card first, then Exert for the
defense to play with it.
5.) Exerting for "Nothing": There may be times where you do not want to play any cards from your hand, you are unable to play cards from your hand, or a strategic element calls for an Exertion. This type of Exertion is known as an Exertion for "Nothing" or a "Useless Exertion". If you chose to make a "Useless Exertion" it must be made before the end of your Attack Phase.
6.) Other Exertion Uses: Some cards or effects, like Exerting to "Regain your feet" ( see Prone) or Exerting to satisfy a card effect, may require you to make an Exertion.
Hidden Attacks: If you have the opportunity to play a Hidden Attack, you may play it face down. Your opponent will need to guess which area to defend. After they have played all of their defenses, reveal the attack. This is one of the few instances where a player may play an inappropriate defense. If the defense is inappropriate, your opponent is allowed to Exert for a better defense, but may not play a new defense from his hand against that attack. If your opponent does not wish to play a defense from their hand against the Hidden Attack, you reveal the attack, and they may choose to Exert for a defense.
Special Attacks: Special Attacks may not be Power Blows (including Head Shots), may not be Hidden, and may not be pulled from an Exertion when searching for an attack. Any Edge Cards modifying or played in conjunction with your Special Attacks are Nullified.
Ranged Attacks: You must have a free hand to play a Ranged Attack (see Hand Icons). Ranged Attacks cannot be blocked under any circumstances and are also Special Attacks.
Dirty Tricks: Dirty Tricks cannot be blocked, do no damage, and cannot be Power Blows. You may play Dirty Tricks even if Disarmed.
Exhaustion: When the last card in
your Endurance is drawn, discarded or otherwise taken from your Endurance, you
Exhaust. You lose 5 Ability during your next Ability Adjustment Phase. Reshuffle
your Endurance (all the cards in your Discard Pile) and
continue
play.
Head Shots: A Head Shot: Event Card is played in conjunction with an upper attack. That attack instantly becomes a Power Blow. If your opponent cannot play a successful defense against the attack, or avoid it, they lose the game and their head immediately. Your attack must be able to become a Power Blow to be a Head Shot. There are cards other than the Head Shot: Event that may modify an attack to become a Head Shot, or attacks that by Game Text are Head Shots. The same rules pertaining to the Head Shot: Event also applies to these cards.
Disarming & Breaking Weapons: During the course of the game, you may become Disarmed, or your weapon may be broken. If your weapon is broken, you are considered to be Disarmed. If either occurs, you may not play attacks or blocks. At the beginning of your turn, in your 'May Do' phase, you have a 1 in 6 chance of recovering your weapon. You do not have this chance if your weapon was broken.
Edge Cards: These cards are not Special Cards. You may play as many Edge Cards per turn as you wish. Edge Cards played in conjunction with any card are countered if that card is countered. Edge Cards cannot be played in conjunction with Special Attacks.
Events: Event Cards briefly affect battle, and are normally swept during your next Sweep Phase.
Situations & Objects: Both Situations and Objects remain in play after being played. You may have multiple copies of the same Situation or Object in play at once.
Locations: Locations remain in play after being played. However, if another Location is played, discard the previous Location. Only one Location by any player may be in play at any time.
Weapons of Choice: Normally, you may utilize only one Weapon of Choice. It cannot be removed from the game. Any player not using a Weapon of Choice is still considered to be using a one handed weapon (one Hand Icon) and has a free hand. Your Weapon of Choice may require one hand (one Hand Icon) or two hands (two Hand Icons) to wield. If you are Disarmed, your Weapon of Choice is turned face down and is out of play until you have regained your weapon or have replaced your broken weapon. While Disarmed, you cannot play Weapon Specific Cards relating to that Weapon. If you happen to be using two Weapons of Choice and are Disarmed, your opponent decides which is Disarmed. You may roll as normal to recover your Disarmed Weapon of Choice.
Prone: During the game, you may become Prone. If you are Prone, you must discard a card from your hand with the same Icon type as any card you play. If you are Prone, during each of your 'May Do' phases you have a 1 in 6 chance of 'regaining your feet'. You may increase this chance to 3 in 6 by making an Exertion before making the roll.
Ignoring or Nullifying: If enabled to do so, you may only Ignore the effects of a card that directly affect you; either instructing you to perform some action, restricting you from performing an action, damaging you, or affecting your Ability. When you Nullify a card or its effects, the card has no effect on any card, player, rule or effect in the game.
Damage vs. Loss of Ability: If a card or effect forces you to lose Ability, it may not be countered with a card that prevents damage.
Discard to Use Cards: The Game Text on these cards usually begins with "Discard this card from play". You may not use a Discard to Use Card the turn it is put into play. You may only discard it after your opponent has played their first card on their next turn.
Countering Cards: If a card is countered, it is immediately discarded, and has no effect on play, but is still considered to have been played.
Removing Cards from the Game: If a card allowing you to add cards to your Endurance is removed, the added card or cards must also be removed. If a card forces you to remove cards from the game, first search your discard pile, then your Endurance, then your hand, and finally cards you have in play to find the card that must be removed.
Minimum Endurance Size: You must begin the game with an Endurance of at least 50 cards.
Allies: An Ally is any non-Pre Game card that depicts a character from the television series or movies, and has their name as the title of the card.